Creating a localhost in Windows (Part 2: Installing PHP 5)
In part one we setup a Apache server and configured the localhost ready for you to use, we also set up the directory where you are going to save your local files. But so far in part one we only essentially setup the localhost, so all of the goodness of being able to view server side documents/scripts etc won’t work yet as you will need to install them, one of the most popular if not the popular server side code is PHP. It is used mostly to create dynamic webpages. Lets install PHP!
Before we begin if you missed part one of creating a localhost in windows go ahead and click here to view it in part one I showed you how to set up Apache and get the localhost running, once you’ve set that up come back here to install PHP!
Step 1: Download the PHP Binary
Remember when I said not everything will be in a installer? Well my statement really shows here, to install php properly on Apache we will be doing it via the binary which means downloading PHP 5 from PHP.net and setting it up manually. First off head obtain the php 5 binary which can be found by clicking here. You will want to find the Windows Binaries section and download the latest zip version of PHP. Select a download mirror and the download should start. All of the binary files are in a zip archive so you will need some unzipping software to get into the file. I’d recommend downloading a free program like WinRaR but Windows does have it’s own unzipping tool built in.
Step 2: Placing the PHP 5 Binaries in your document root
Once you’ve downloaded the php 5 binaries and unzipped the archive, you will now need to place all of the contents of the zip archive into your document root. Well I say document root but, you don’t have to. If we go back to Part one of the tutorial you should remember the part where we defined the document root of where all of the webpages, files etc will be. To keep it simple I used my computers C:/ drive as the document root and within the C:/ created a folder called localhost and the within it created a folder called public_html. All of my localhost files, webpages etc will be within the public_html folder, and apache knows to look there as I defined it as the document root. If you need a bit of refresh about the document root click here to go back to part one and read step 4
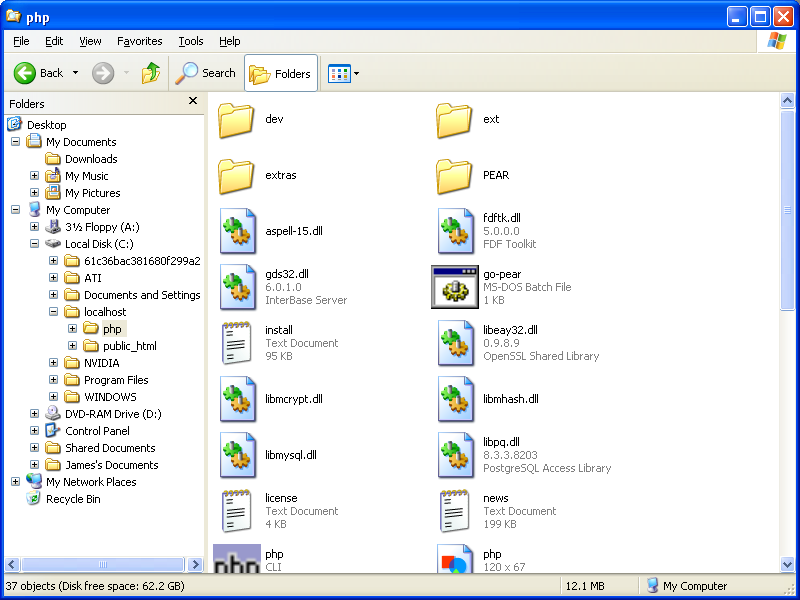
What I’ve decided to do is create a folder called php in my localhost folder, but not within the public_html. This is simply to keep all my binaries and files organised and away from my webpage files. So the location is C:/localhost/php and then extract all of the contents of the zip archive into the php folder located on the C:/ so now within the php folder there are all the binary files.

It should be extracted so it looks like this:
Step 3: Your PHP.ini file
When you look at your PHP binary files look for a file called php.ini-dist by default this file has had it’s ini status removed to avoid problems during install, but what you need to do if go ahead and removed the -dist part of the filename so you are left with php.ini much like the Apache httpd Conf, the php.ini file is the configuration of php and we’ll need to do a bit of editting to get it to work correctly on our localhost. Edit the php.ini file in any editor and scroll down about halfway to find this part of the config:
doc_root
Like I was starting to reference in Step 2 the document root will be relative to whatever you set the document root to in the Apache httpd conf, so for me it would be:
doc_root = "C:localhostpublic_html"
About 10 more lines down you will also see this line:
extension_dir = "./"
You will need to also change this to where your PHP binary files are located for me it would be:
extension_dir = "C:localhostphpext"
Step 4: Error Reporting (Optional)
As you know a localhost has many uses, but one major use is the ability to test out scripts and dynamic content, so if your going to be doing a bit of testing then I suggest you turn on something called error reporting. This is a feature in PHP that gives off errors when there are mistakes in PHP code, by default this feature is not enabled so if a PHP script had errors no message would be displayed to help you fix it. This step is optional but I’d recommend doing it. To enable error reporting you will need to find this line in the php.in file:
error_reporting
By default this is what will be set:
error_reporting = E_ALL & ~E_NOTICE & ~E_STRICT
Change it to:
error_reporting = E_ALL | E_NOTICE | E_STRICT
Now error reporting is enabled!
Step 5: Adding the PHP Module to Apache httpd conf
Apache doesn’t know that PHP is installed yet, as the module is not being loaded in the apache conf. You will need to add the module into the configuration file. Remember to edit the Apache configuration file you go to Start > Programs > Apache HTTP Server 2.2 > Configure Apache Server > Edit Configuration file
You will then need to add this to either the very beginnning or the very end of your Apache Conf, I’d recommend placing it at the very beginning above all the other modules (Just look for LoadModule in config to see the placement area):
LoadModule php5_module "C:/localhost/php/php5apache2_2.dll"

	AddType application/x-httpd-php .php

	PHPIniDir "C:/localhost/php"
However if you not use the same document root etc you will need to edit the two lines:
LoadModule php5_module "C:/localhost/php5apache2_2.dll"
And
PHPIniDir "C:/localhost/php"
To your document root. Make sure you change both!
Step 6: Testing PHP
Before anything else you must restart your Apache service has you have added in a new module and a restart is required for Apache to load the new module and to realise it’s there. Remember to start, stop or restart the Apache service you can either right click on the tray icon and select open apache monitor:

Or go to Start > Programs > Apache HTTP Server 2.2 > Control Apache Server and select the restart command. If you edited the httpd while the service was stopped then you will simply need to start the service and the new module will be loaded in (Starting the service serves a similar purpose to a restart)
To test if PHP is working go ahead and create a document called php_test.php and place this code within it:
<?php
phpinfo();
?>
Save it within your document root, mines C:/localhost/public_html and then view it. To access the file I would go to: http://localhost/php_test.php in any of my internet browsers. If you see a table with php services listed then PHP is working on your localhost! You can now view php scripts and dynamic pages locally!
In Part 3 of creating a localhost in Windows we will be installing MySQL, which is a relational database management system which will allow us to easily create databases. Giving you the ability to create databases on your localhost
